My Holiday project series is about to begin, but ONLY mailing list subscribers will receive it! Make sure to sign up for the mailing list here on my website by September 20th to get the "12 Weeks of Holidays" emails! Let your crafty friends know, too!
~Elisa
Showing posts with label projects. Show all posts
Showing posts with label projects. Show all posts
Thursday, September 16, 2010


Saturday, August 14, 2010
Get your FREE project download!
I'm going to send all of my newsletter subscribers a free gift on August 16th - a project download, with instructions & "ingredients." But you have to be on my mailing list by August 15th to receive it! Sign up in the box at the top left of my website!
I hope to "see" you there soon!
Happy crafting!
~Elisa
I hope to "see" you there soon!
Happy crafting!
~Elisa
Wednesday, December 02, 2009
Christmas Gift Card Holders
My sister and I made these fun gift card holders over the Thanksgiving holiday weekend, and I wanted to share them! They are REALLY easy to make with card stock, designer series paper, stamps and ribbon. They are all made with the Top Note die and the Big Shot die cutting machine. I've listed "ingredients" below each picture.

Night of Navy and Whisper White card stock. Silver cording. Night of Navy classic ink. Silver Encore ink. Snowflakes are from the Christmas Punch hostess stamp set. The stamp on the front is from Sale-A-Bration last year, a set called Yummy.

Real Red card stock and Christmas Cocoa designer series paper. Real Red grosgrain ribbon. Chocolate Chip classic ink. Yummy stamp set.

Old Olive card stock and Merry Moments designer series paper. Real Red grosgrain ribbon.

Chocolate Chip card stock and Merry Moments designer series paper. Real Red grosgrain ribbon.
These are SO quick and easy to make. If you need gift card holders for this Christmas then let me know. I can either make what you need ($1.50 each if using supplies I already have, more if I have to special order paper or ribbon) -or- you can schedule a time with me to come over and make your own. Contact me right away to order or schedule! I can also schedule time with you to make Christmas gift tags.
~Elisa

Night of Navy and Whisper White card stock. Silver cording. Night of Navy classic ink. Silver Encore ink. Snowflakes are from the Christmas Punch hostess stamp set. The stamp on the front is from Sale-A-Bration last year, a set called Yummy.

Real Red card stock and Christmas Cocoa designer series paper. Real Red grosgrain ribbon. Chocolate Chip classic ink. Yummy stamp set.

Old Olive card stock and Merry Moments designer series paper. Real Red grosgrain ribbon.

Chocolate Chip card stock and Merry Moments designer series paper. Real Red grosgrain ribbon.
These are SO quick and easy to make. If you need gift card holders for this Christmas then let me know. I can either make what you need ($1.50 each if using supplies I already have, more if I have to special order paper or ribbon) -or- you can schedule a time with me to come over and make your own. Contact me right away to order or schedule! I can also schedule time with you to make Christmas gift tags.
~Elisa
Monday, June 15, 2009
Remember Shrinky Dinks?
If you are a certain age (like me) then you remember all the fun you had putting plastic shrinky dinks in the oven to make various charms, bookmarks, etc. Well, here is my recent version, with special thanks to my sister for the idea! These photos were taken with my camera phone, so the quality isn't the greatest - but you get the idea at least!

The BEFORE Photo: These images are from the retired stamp set from Stampin' Up! called Baby Firsts. I chose this stamp set because Liam is now 6 months old and I wanted to try to make charms with his "firsts" in mind. This stamp set has 8 stamps in it, but Liam has only done 4 of the 8 "firsts" so far. I'll make the rest later. I've included the actual stamp in the photo for size reference. The stamp is about 2x2 inches.

The AFTER Photo: See the difference? These are perfectly sized for little charms either on a necklace or bracelet.
Special notes: I stamped the images on shrink plastic using Classic Basic Black ink from Stampin' Up! Then, I colored the images with my Stampin' Write Markers. I then punched the images out with my 1 3/4 circle punch, 1 3/8 square punch, and scallop circle punch. Next, I punched the hole in each one using my Crop-A-Dile and attached the ring. Finally, each charm was heated using a heat emboss tool until it was finished shrinking! No more waiting for the oven!
On the back of each charm I plan to write the date that Liam accomplished each "first". I haven't decided whether to wear my charms on a necklace or bracelet, but I know this is something I will LOVE to wear.
I hope you enjoy these! They were fun and easy to make. And now I have personalized charms all about my boy!
~Elisa

The BEFORE Photo: These images are from the retired stamp set from Stampin' Up! called Baby Firsts. I chose this stamp set because Liam is now 6 months old and I wanted to try to make charms with his "firsts" in mind. This stamp set has 8 stamps in it, but Liam has only done 4 of the 8 "firsts" so far. I'll make the rest later. I've included the actual stamp in the photo for size reference. The stamp is about 2x2 inches.

The AFTER Photo: See the difference? These are perfectly sized for little charms either on a necklace or bracelet.
Special notes: I stamped the images on shrink plastic using Classic Basic Black ink from Stampin' Up! Then, I colored the images with my Stampin' Write Markers. I then punched the images out with my 1 3/4 circle punch, 1 3/8 square punch, and scallop circle punch. Next, I punched the hole in each one using my Crop-A-Dile and attached the ring. Finally, each charm was heated using a heat emboss tool until it was finished shrinking! No more waiting for the oven!
On the back of each charm I plan to write the date that Liam accomplished each "first". I haven't decided whether to wear my charms on a necklace or bracelet, but I know this is something I will LOVE to wear.
I hope you enjoy these! They were fun and easy to make. And now I have personalized charms all about my boy!
~Elisa
Friday, June 05, 2009
June Stamp-A-Stack Tonight!
Here are photos of the cards we are making tonight. Ingredients are listed on my Picasa slideshow (check the right hand column).


ENJOY! And have a great weekend!
~Elisa
Wednesday, May 20, 2009
Big Shot Class Projects
My Technique Class about using the Big Shot die cutting machine was last night - and we had FUN! I'm posting the projects we made!

Card/Frame using the top note die for the Big Shot. CS: Only Orange & Whisper White. So Saffron DSP. Flight of the Butterfly stamp set.

Card using texture plate for the Big shot. CS: Tempting Turquoise, Apricot Appeal, Whisper White. Rainbow Sherbet DSP. Yes, my stamped message is crooked. I should have used my Stamp-A-Majig! Trendy Trees stamp set.

Box made using the scallop envelope die for the Big Shot. Holds 3x3 cards. CS: Pumpkin Pie, So Saffron, Bashful Blue, Whisper White. Washington Apple DSP. Itty Bitty Buds stamp set.
My next events are:
June 5th: Stamp-A-Stack: Father's Day, Sympathy, Get Well Cards
Editted to ADD: June 16th: Technique Class - All Things Punchy! (Date changed from June 23rd)
June 19th: Crop 'n' Craft Night
See my Demonstrator Website for details. Call or email me to RSVP/Register.
~Elisa

Card/Frame using the top note die for the Big Shot. CS: Only Orange & Whisper White. So Saffron DSP. Flight of the Butterfly stamp set.

Card using texture plate for the Big shot. CS: Tempting Turquoise, Apricot Appeal, Whisper White. Rainbow Sherbet DSP. Yes, my stamped message is crooked. I should have used my Stamp-A-Majig! Trendy Trees stamp set.

Box made using the scallop envelope die for the Big Shot. Holds 3x3 cards. CS: Pumpkin Pie, So Saffron, Bashful Blue, Whisper White. Washington Apple DSP. Itty Bitty Buds stamp set.
My next events are:
June 5th: Stamp-A-Stack: Father's Day, Sympathy, Get Well Cards
Editted to ADD: June 16th: Technique Class - All Things Punchy! (Date changed from June 23rd)
June 19th: Crop 'n' Craft Night
See my Demonstrator Website for details. Call or email me to RSVP/Register.
~Elisa
Monday, May 18, 2009
Card Swap
I just made 14 of these last night for a card swap tomorrow. The theme was Father's Day OR Masculine Birthday. My card is a birthday card with the greeting inside. Trendy Trees, Birthday Wish, & Matchbox Messages stamp sets. Paper piercing, brads, stamp-a-majig, and cutter kit were also used. VersaMark, Handsome Hunter & Chocolate Chip classic ink. Card stock is Close to Cocoa, Not Quite Navy (one of my new favs), and Handsome Hunter. I used the Birthday Wish stamp set on the inside in Chocolate Chip, and used the "frame" stamp from Matchbox Messages around it. Thank you stamp-a-majig!


Thursday, January 10, 2008
Guest Blogger - Alex!
Check out this adorable frame project that Alex made!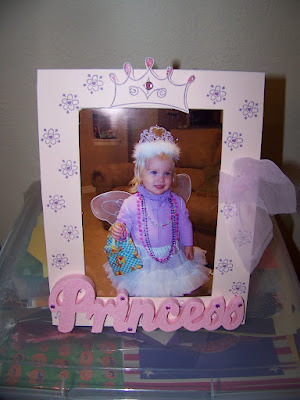
This cutie is her daughter Camille. Alex made this using stamps on Blush Blossom card stock, which she then attached to the cardboard frame. She then attached the wooden cutout for the "Princess" at the bottom. The stamp set she used is called "Perfect Princess" and it is on page 77 in the Spring-Summer Collection 2008 catalog. Fantastic!
Share your projects with me and you could be featured as a Guest Blogger too! All I need is a picture and what you used to make your project.
~Elisa

This cutie is her daughter Camille. Alex made this using stamps on Blush Blossom card stock, which she then attached to the cardboard frame. She then attached the wooden cutout for the "Princess" at the bottom. The stamp set she used is called "Perfect Princess" and it is on page 77 in the Spring-Summer Collection 2008 catalog. Fantastic!
Share your projects with me and you could be featured as a Guest Blogger too! All I need is a picture and what you used to make your project.
~Elisa
Monday, December 17, 2007
Calling All Creative Customers!
I'm still looking for "guest bloggers" to show off their craftiness RIGHT HERE on Mirror Image Crafts. You - yes YOU - could have your cards, scrapbook pages, or 3D projects displayed on this site. All you have to do is email me with a photo of your project, a list of supplies you used, and any instructions you need to provide.
I know a lot of you have made some really cute things for the holidays, so what are you waiting for! Show it off!
~Elisa
I know a lot of you have made some really cute things for the holidays, so what are you waiting for! Show it off!
~Elisa
Saturday, October 20, 2007
Copying is Flattery, Right?
My wonderful and supportive upline with Stampin' Up!, Anne, is doing a feature on her blog site that I would like to offer as well. She invites her customers to submit projects they have done and she posts them on her blog as a guest blogger.
If you have designed something that you are just burning to share with others, then let me know! I will post it on my site with your name on it. All I need is an email from you with a photo of the project, what you used on your project, and any instructions if necessary. I will take anything you would like to submit: scrapbook pages, cards, 3D elements. Submissions should be your original work or you should give credit where credit is due.
Contact me with any questions and let's see what you've got!
~Elisa
If you have designed something that you are just burning to share with others, then let me know! I will post it on my site with your name on it. All I need is an email from you with a photo of the project, what you used on your project, and any instructions if necessary. I will take anything you would like to submit: scrapbook pages, cards, 3D elements. Submissions should be your original work or you should give credit where credit is due.
Contact me with any questions and let's see what you've got!
~Elisa
Monday, September 17, 2007
Here Come the Holidays
Hey everyone! With the holiday season fast approaching, it's certainly not too soon to start thinking about decor and gift giving. Whether you need to make party favors for your kiddos class for Halloween, Thanksgiving place cards, or gift tags & cards for Christmas & Hanukkah, I've got you covered. Stampin' Up! not only has beautiful papers and stamps for all your needs, but I can assist you with ideas, too!
Hopefully you have your copy of the Fall & Winter 2007 Collection AND the current Holiday mini catalogs. If you don't - please let me know right away so I can send you what you need.
I've had a wonderful time creating cards, scrapbook pages and other projects with our punches, Designer Series Papers and festive holiday stamps. Check out the slideshow gallery in the right-hand column to see a few of my latest samples.
If you find yourself adding TONS of items to your "wish list" then I have a couple of suggestions for you:
Watch this site (or go ahead and subscribe) for updates on my upcoming classes and events as well as any and all specials taking place. Most of my classes for the remainder of the year will have a holiday focus, so come and join the fun.
Have a simply wonderful day-
~Elisa
Hopefully you have your copy of the Fall & Winter 2007 Collection AND the current Holiday mini catalogs. If you don't - please let me know right away so I can send you what you need.
I've had a wonderful time creating cards, scrapbook pages and other projects with our punches, Designer Series Papers and festive holiday stamps. Check out the slideshow gallery in the right-hand column to see a few of my latest samples.
If you find yourself adding TONS of items to your "wish list" then I have a couple of suggestions for you:
- you can be a hostess for your own Stampin' Up! workshop and earn FREE stamps and merchandise
- you can give me a copy of your "wish list", along with the name (or names) of loved ones who will need to buy gifts for you this year. I can contact them and let them know exactly what is on your list so they can choose to support your crafting habit
Watch this site (or go ahead and subscribe) for updates on my upcoming classes and events as well as any and all specials taking place. Most of my classes for the remainder of the year will have a holiday focus, so come and join the fun.
Have a simply wonderful day-
~Elisa
Tuesday, July 10, 2007
I've Got News!
Dear Friends - Well, Blogger is acting funny and won't let me give this post a title so see it above.
I've joined the revolution and created my very own Stampin' Up! Website, elisaford.stampinup.net. Let me know what you think! I've posted project pictures in the Art Gallery that E & I have been working on this summer. I've had so much fun with my new stamp sets, especially the hostess set called "Vases In Vogue". If you don't have the new catalog yet - let me know so I can get one to you right away!
In other news, I've added a feature to this site called "Recent Project Sample", for a stunning lack of a better name. I'll take suggestions on a better name!
I hope you are all doing well and enjoying your summer. Let me know what I can do for you!
~Elisa
Dear Friends - Well, Blogger is acting funny and won't let me give this post a title so see it above.
I've joined the revolution and created my very own Stampin' Up! Website, elisaford.stampinup.net. Let me know what you think! I've posted project pictures in the Art Gallery that E & I have been working on this summer. I've had so much fun with my new stamp sets, especially the hostess set called "Vases In Vogue". If you don't have the new catalog yet - let me know so I can get one to you right away!
In other news, I've added a feature to this site called "Recent Project Sample", for a stunning lack of a better name. I'll take suggestions on a better name!
I hope you are all doing well and enjoying your summer. Let me know what I can do for you!
~Elisa
Thursday, April 19, 2007
MANY Marvelous Markers!
You have to see these amazing markers for yourself. I recently got my own set and have fallen in love! Whether you stamp, scrapbook, papercraft, or all of the above, these markers are for you. The entire set of 48 in all of the exclusive custom colors of Stampin' Up! comes in its own carrying case. The markers are double-sided, with one side for journaling and the other for brushing color onto your stamps or whatever other fabulous techniques you wish to try. See the sample card I've made below with my new markers. I used one stamp (from The World Over hostess set) and colored the different parts of it with 3 colors of markers before stamping. You can't do that technique with an ink pad! Also, the ribbon below is white grosgrain that I colored with the markers to match my project. These markers are MARVELOUS!!!

Online Catalog Link for the markers!: http://catalogs.shoplocal.com/stampinup/index.aspx?pagename=moreinfo&circularid=8778&pagenumber=202&uniqueid=7217356&storeid=1038724
Contact me for more information about the markers, or any other product. Happy stamping, and "markering!"
~Elisa

Online Catalog Link for the markers!: http://catalogs.shoplocal.com/stampinup/index.aspx?pagename=moreinfo&circularid=8778&pagenumber=202&uniqueid=7217356&storeid=1038724
Contact me for more information about the markers, or any other product. Happy stamping, and "markering!"
~Elisa
Wednesday, February 07, 2007
New Workshop Samples
Last Saturday's workshop at Shelia's home was so much fun, and I wanted to share what we created there. The ladies in attendance were either scrapbookers or interested in becoming scrapbookers, so that is primarily what I focused on with the projects.
Sample 1 is a 6x6 mini-page using Simply Scrappin' Party Pieces and the stamp set Quick Thinking. Our Simply Scrappin' sets make scrapbooking AND cardmaking SO fast and easy and the sets coordinate with our custom colors:


Sample 1 is a 6x6 mini-page using Simply Scrappin' Party Pieces and the stamp set Quick Thinking. Our Simply Scrappin' sets make scrapbooking AND cardmaking SO fast and easy and the sets coordinate with our custom colors:

Sample 2 is a 6x6 mini page made using the Designer Series double-sided paper from the Winter Mini catalog called Enchante'. I also used the regular and small tag punches and the Mr. & Mrs. stamp from the Taggers Dozen... also in the Winter Mini catalog. The edges of the torn paper are distressed with Close to Cocoa from the Stampin' Pastels:

Sample 3 was our "Make & Take" card. It's a sweet little thank you card using Cool Caribbean & Whisper White cardstock, Designer Series paper from the current Winter mini catalog called Loves Me, and ribbon also from the Winter mini called Flirty. The stamp sets I used are Much Appreciated and from the upcoming Spring mini catalog, Polka Dots & Paisley:

Contact me to plan your workshop today! I can bring projects specifically designed to interest you and your guests. And these workshops are so much fun! If you schedule before Sell-A-Bration ends you and your guests will get even better benefits. I can't wait to hear from you!
Elisa
Monday, November 06, 2006
Added Project Photos
I've uploaded some pictures of the cards and other projects I've completed as of today using Stampin' Up! products from my demonstrator kit. They are on the flikr badge below along with the scrapbook pages I had already uploaded. I've done 15 projects so far, but the only ones you will see in individual photos are the ones that I either designed on my own or changed considerably from an SU design. The rest are in the big group photo. If you want information about any of the projects let me know. I would be happy to talk to you about a workshop for you and your friends to show you how to make any of them!
Happy Monday!
Elisa
Happy Monday!
Elisa
Subscribe to:
Posts (Atom)